
Making your MP3 files mobile
Question: How do I make an audio CD with audio files I’ve downloaded to my computer? – B.K.
Answer: These days, the most common format for music files on the web is MP3. So let’s go through step-by-step instructions on how to create an audio CD from MP3 files on your computer. You’ll end up with a disk that should play on most CD players in home stereos, and computer CD and DVD drives as well as portable CD players.
The first thing you’re going to need is CD creation software. You want to burn the files onto a blank CD. The term burn refers to the process of permanently transferring files onto CD using special burner software and a CD-R or CD-RW drive (CD-RW? CD-R? What’s the difference?). Those drives use a laser to change the surface of a blank CD and in doing so store data to it. For purposes of this column, we’re going to take you through a burning process using Nero Burning ROM, a CD burner utility from Nero. (NeroPortal). You can get the demo version from the Nero 7 Trial and install it. It’s free for 30 days. Or you can buy the full Nero 7 Ultra Edition.
There are several reasons Nero is an excellent program for this purpose. It can automatically convert MP3 files into standard CD audio files while burning – no need to convert the files first. Its interface is very easy to use, with a simple drag-and-drop approach to CD creation. The software is very dependable, supports a wide array of hardware, and has a low incidence of errors which would result in the creation of dud disks (commonly referred to as “coasters”).
So let’s begin! Your first step is to get a copy of the software (from the links mentioned above) and install it. Once that’s done, you’re ready to try creating your first audio CD. The following images were taken using an older version of Nero Burning Rom Version 5.5, the most recent version is Nero 7 Ultra Edition.

One of the helpful things about Nero is its “Wizard”. As seen below, the wizard will ask you questions about the type of CD you wish to create. Follow the wizard’s questions and choose compile a new CD, then Audio CD, then Finish. As the wizard points out, it is unwise to use rewriteable CDs (also called CD-RWs) – to create audio CDs, so stick with blank CD-R disks. CD-R disks can be burned once and only once. After the data is on them, it cannot be removed. On the other hand, CD-RW disks can be burned, then erased, then burned again, many many times.
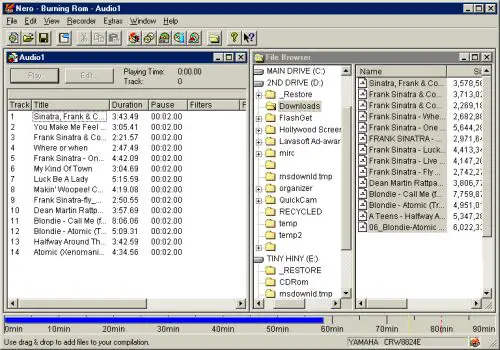
Now we find ourselves at the main Nero window. Notice how the program is divided into a left window, a middle window, and a right window with a task bar above and an index below.

On the right side of the center of the window, you can see a file browser made up of two windows (middle window and right-hand window). They operate much like Windows Explorer does when it shows folders and files on your hard drive – your hard drives and folders are viewed on in the middle pane and file content is on the right. In the middle pane, select the hard drive in which you have stored your MP3 files, and then find the folder that contains the songs you wish to burn onto CD. Now drag them from the right pane into the left hand panel which is titled Audio 1.
As each file is added to the list, two things will happen. First, Nero will check each file to be sure it isn’t damaged or corrupted. A corrupted file could result in an error during burning that would ruin the CD and make it unplayable. If Nero warns you that a file is corrupted, it is highly advisable that you not use it for your CD. If you still want to include that song, obtain a different copy.
Second, you’ll notice the bar at the bottom begins to increase as each file is added. This bar measures the estimated length of each file and the relative room it will take up on the final CD. Notice the yellow and red dotted lines at the end of the bar. These indicate the “caution zone” for most conventional CDs. If you try to stuff too many songs onto the CD, the bar will turn yellow and then red indicating that Nero could, and probably will, fail in creating the finished CD since the data size exceeds the capacity of the disk.
Note that you’ll get about 70 minutes of audio on the CD. Of course, song lengths vary, but if we assume each is about four minutes, you’ll get about 16 or 17 tracks on your audio CD. Try to keep the bar blue and to the left of the yellow line.
When you’re finished – and provided that none of your individual tracks failed the Nero file integrity check- your window will look something like this:
At this point, feel free to change the order of the songs by dragging them up or down the list. Nero will automatically add a two-second delay before each track just as you’d find on most store-bought pre-recorded CDs. If the tracks are meant to flow together without a break, then do the following for each: Right-click on the track you want to begin without a pause. Select Properties from the menu. A window like the one below will open.
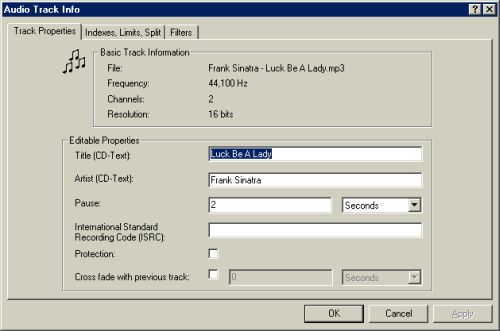
In this window, you can change the pause to “0” seconds. The finished CD will then have no pause between the end of the previous song and the beginning of this one.
Under the Filters tab, you will find various options you can place on the burning of the file, such as echo, distortion, and such. For a beginner, these settings are best left alone. When you are finished compiling your CD, click the opens write CD dialog button on the top task bar, or open the File menu and select Burn CD. A new window will appear that looks like this:
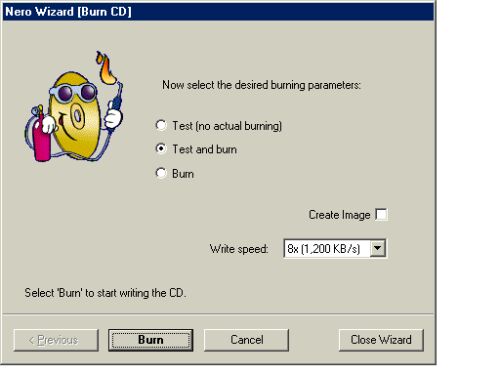
Depending on the speed of your CD burner, several write speed options are available. I would suggest using the highest setting, provided you have a fast computer processor (think in terms of a 400 MHz Pentium II or better), a decent amount of RAM (128 MB is reasonable), and no memory or hard-drive-intensive programs running while you burn. If you have a slower system or a small amount of RAM, I’d suggest running the burn at a slower write speed. Regardless of your system speed, I’d also urge you to switch off other programs, including screen savers, while the burn takes place.
I also strongly suggest choosing the Test and Burn option. This will prompt Nero to run a full test of the CD burn. If anything goes wrong, the test will fail and will tell you why, and the blank CD in your burner will be untouched and still usable. If the test is completed without problems, Nero will proceed to burn the actual CD.
When Nero finishes burning the CD, a box will appear telling you that the burn was successful. Congratulations – your CD should now be playable in any CD player just like your other CDs! Some further things to consider: Ensure you buy a brand of blank CDs (CD-Rs) compatible with your burner. Depending on the CD manufacturer, there should be a list of compatible brands on their web site. If you can’t find such a list, then only buy your CDs individually at first (not in 50 CD bundles) until you’re sure you’ve found a brand that works for you.
Try to obtain MP3 files that are of decent quality. The file should have a bit-rate no less than 128 Kbps(160 or 192 are preferable). The lower the bit-rate, the greater the compression, and the greater the compression, the more of the original sound quality is compromised. You can figure out what bit-rate a file has by opening it in an MP3 player such as Winamp or Microsoft Media Player. If you burn a CD with MP3s with bit-rates of 128 or less, you will hear a difference from an identical CD burned with the same files at higher bit-rates.
This has been a very basic introduction to Nero and audio CD creation. More help on Nero’s advanced features can be found in the program’s help menu.
See related audio questions:
- Managing MP3 music on your computer
- All about MP3 and WMA files: A digital audio primer
- CD-RW? CD-R? What’s the difference?