How to change Virtual Memory settings
It’s easy to forget that there are none of the billions of gnomes inside our computers, moving stuff all over the screen. Especially when all runs well within the box. That’s when you can blissfully ignore its deeper workings.
But there are times when you’ll be forced to dive into the guts of your operating system. You’ll be trying resolve an issue or help speed up your computer’s performance. One of these features you might need to alter is the Virtual Memory and its settings.
When you are using your computer for something that requires a lot of power, like gaming or video editing, it might run out of room in its RAM. To prevent your computer from crashing, Virtual Memory fills in for RAM by using your hard drive as a sort of ‘pretend’ RAM.
There is no substitute for real RAM, but still, Virtual Memory (VM) keeps your computer from crashing in the event you do run out of RAM. Alas, it’s slow as heck, and it eats up hard drive space. Setting it properly requires some skill; Too little of it brings about the risk of a crash. Too much is a waste.
For the most part it’s best to have it set to about 2.5 times the amount of real RAM you have.
You might need to change this setting to make your computer run at its best. It’s also a good idea to disable it before you defragment your drive. It’ll make better use of the hard drive because VM creates a Swap File (also known as a Paging File) that cannot be written over. When you disable VM, that portion of the hard drive can now be written over, making it easier to clean up the drive.
To disable or change virtual memory in Windows XP :
:
- Select ‘Start’
- Click on ‘Control Panel’’
- Depending on your setting, you’ll see one of two Control Panel views, Category and Classic. Category View will have four Categories to choose from, Classic View will just show a bunch of icons.
- In the Category View click on ‘Performance and Maintenance’ then select ‘’System’.
- In the Classic View, just select ‘System’.
- In the System window, click on the ‘Advanced’ tab at the top.
- The first option in the Advanced screen is ‘Performance’. Click on the ‘Settings’ button.
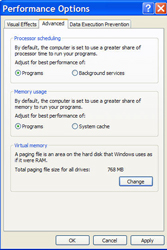
- Click on the middle tab called ‘Advanced’
- At the bottom of that window you’ll see Virtual Memory. In that area you’ll see what your computer’s VM is set to. Just below it, click the ‘Change’ button.
- Here, you’ll see your drives at the top, as well as the size of the Paging File. Below that are three buttons. Custom Size, System Managed Size and No Paging File.
- If you want the easiest solution to a low VM issue, select ‘System Managed Size’, and click the ‘Set’ button in the right of it. Windows will change the size of the Paging File to what it feels is best to prevent RAM issues. If you’re a tweaker who wants more control over your computer, you can also select Custom size, and enter 2.5 times you actual RAM size. If you had 128MB, you’d type in 320 for both the Initial Size and the Maximum size. Again Click the ‘Set’ button to save the change.
- If you are making these changes to perform a clean defragmentation of your computer, select No Paging File and click the ‘Set’ button.
- Regardless of which option you chose, click OK and your computer will tell you that the computer needs to restart to make the changes.
- Before closing the System Properties window, click Apply to make your changes stick, then Ok. Now you can restart your computer.
- After you computer has restarted, your new VM settings will be active, just don’t forget to turn VM back on when you are done defragmenting.
It’s important to leave VM on, though. No matter how much RAM you have, there’s always the chance you’ll run out.
Here’s the Windows Vista recipe:
For Windows Vista, the same scenario applies; it’s just a bit different in setting it up:
- Click on the Start button.
- Select ‘Control Panel’
- Go to ‘System and Maintenance’
- Select ‘System’
- On the left-hand column of the window, under the Tasks list, you’ll see ‘Advanced System Settings’
- Select the middle Tab labeled ‘Advanced’
- Now the rest of the process is exactly like XP. Select ‘Settings’ from the top ‘Performance’ option.
- Again, select the middle ‘Advanced’ tab in the Performance Options window.
- Under the Virtual memory header, select ‘Change’
- As with XP, select Custom size, System Managed size, or No Paging File.
- Click ‘Set’ to save the changes, click Apply and then, click Ok.
This way to handle your computers VM settings is as simple and painless as possible. Just remember, no matter what OS you use or how much RAM you have, Virtual Memory is an important part of any operating system’s normal function.

